If you ever wanted to create screenshots of a virtual machine (for a tutorial, a presentation, a forum post or any other reason), you probably already noticed that the VirtualBox GUI does not offer a screenshot function.
Although using additional programs (like GIMP, for example) would get the job done, you do not need them, because VirtualBox does offer screenshot functionality on the command line. And using the built-in function has two advantages:
- The screenshot will only include what is seen in the virtual machine and won’t include the VirtualBox window the machine is running in or even the whole Desktop, so there is no need to edit the screenshot.
- The screenshots can be made without user-interaction, which is nice if you need to create screenshots automatically with a script or a cron job (e.g. if you want to take a screenshot every 5 minutes – for whatever reason you might have – you could completely automate the task).
The command to take a screenshot generally looks like this:
VBoxManage controlvm <uuid> screenshotpng <file>
or like this
VBoxManage controlvm <name> screenshotpng <file>
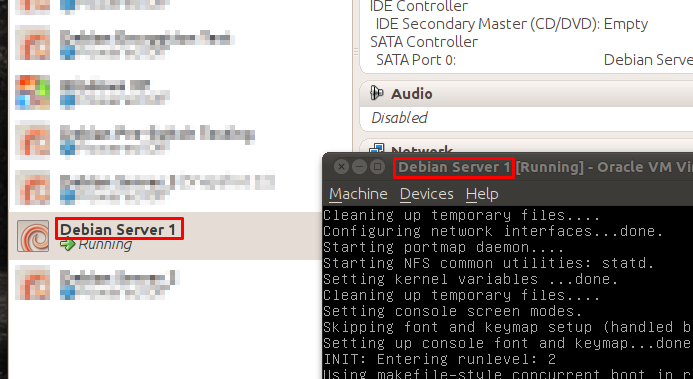
depending on whether you want to use the UUID or the name of the virtual machine. The name for the virtual machine can be obtained directly from the VirtualBox Manager window or from the window of the running virtual machine:
As you can see in the screenshot, the name of the virtual machine is “Debian Server 1″.
If we wanted to take a screenshot of the machine and save it as “server.png”, we could therefore use the following command:
VBoxManage controlvm "Debian Server 1" screenshotspng server.png
And this is what the screenshot would look like:
Appendix: Using UUIDs
UUIDs vs Names
You might also want to think about using the UUID instead of the name of a virtual machine, depending on your situation. Both have their advantages and disadvantages, especially when working with scripts. I am not going to cover this topic in-depth, but let give you something to think about. The advantage of using UUIDs is that you can rename your virtual machines without having to edit the scripts which reference the, directly, because the UUID will stay the same. This is especially useful if you might want to migrate your virtual machine to a different host, because if the new host already has a virtual machine with the same name you have to rename one of them.
But now think of the following situation: You have a virtual machine named “server” that you want to migrate to a new host. And you wrote some scripts that somehow work with this VM by using it’s name. The new host already has a VM named “server”, which prevents importing the VM. So you just rename the VM you want to migreate to “server2″ and add it, which works great, because there was no VM with the name “server2″ before. But now your scripts, which reference a VM called “server”, suddenly work on the VM which was already there and not on the VM you migrated (which is now called “server2″) and for which the scripts were written. It’s very easy to forget to alter your scripts to reflect the name change after renaming a virtual machine. But an even bigger problem is: Because there still is a VM called “server”, you don’t even get an error message.
On the other side, two advantages of using the name of the virtual machine that I can think of, are the fact that the name is very easy to see and change in the VirtualBox GUI, so working with VM names in VirtualBox is easier. And if you use the command line, typing a name is certainly easier and faster (depending on the names you use, of course) than typing the UUID.
Therefore, I personally prefer using the names when using the command line directly and using the UUIDs in scripts.
Getting the UUID
In case you want to get the UUID of a virtual machine, you can type the following:
VBoxManage showvminfo <name>
This will print a lot of info, though. To just get the line with the UUID, you can type:
VBoxManage showvminfo <name> | grep ^UUID
In this example, you would type:
VBoxManage showvminfo "Debian Server 1" | grep ^UUID
which gives you something like this:
UUID: e9e99378-3332-42f4-a6a3-d5490123fe33
And if you really just want the UUID, you might use the following:
VBoxManage showvminfo "Debian Server 1" | grep ^UUID | sed 's/UUID: *//'
to get an output like this:
9e99378-3332-42f4-a6a3-d5490123fe33


